I'll admit it: I had a hard time with git.
I've used Perforce, ClearCase, Mercurial, and even my own super-ugly flavor of copying directories to "backup", "old", "_saturday_night", or "before_I_put_the_feature_in" directories. None of them comes close to the mental-model struggle I've had learning git. So, in an effort to concatenate my learning, here you go. (If you don't care to learn how to use the distributed source control method that seems to be the source control most frequently used among open-source developers on the web, by all means, skip this post and go watch TV.)
So here goes. Feel free to comment on where things could be clearer. I'm no expert yet.
I started by making an account at
GitHub. For other reasons, I downloaded
Cygwin, and included git. You don't have to do that. You can simply download
the git client if you like, based on your particular operating system. Install it and go to the command line. I'll wait here.
Git command line in Cygwin
If you can type git and press enter and then see something like the above, you are ready to start. If not, play it again Sam.
If you have a directory of files you'd like to turn into a git repository, use git init
This is not what we're doing in the tutorial though. :-)
Log in to your GitHub account. I just logged into mine and created a repository:
https://github.com/karlfakegitaccount/learn-git All it has in it is a Readme.md file. I'm going to call this repository I just made my "master" repository or my "upstream" repository. I've seen both aliases used for this one and don't know which is more common.
Conceptually, this is the repository where I will release new versions of my software from. To get released, software must be merged into this repository that is stored on GitHub. This is an arbitrary decision I have made, but it seems most folks make the same decision.
Now, for day-to-day working, I'm going to create a "fork" of this master repository that I'm going to call "origin". This fork will go in my day-to-day GitHub account, karlmortensen. (I made an extra account so I could show how to get changes back into some external baseline...) A fork is an exact copy of everything at a specific point in time. It seems "origin" is general parlance for the fork that you use to save your day-to-day work into. When the time comes, we will ask the master repository owner (karlfakegitaccount who happens to be me, as I just created it a few minutes ago) to "pull" changes from "origin" (karlmortensen account) to "master" (karlfakegitaccount). This is the only path I've seen for getting changes into the master repository (repo).
Do you mind if I drop the quotes around origin, master, and upstream? Dropped!
To get a working copy in my regular karlmortensen account, I simply use the GitHub GUI. I logged in to my regular GitHub account (karlmortensen), and used this search: "learn-git user:karlfakegitaccount". This got me a link to the master repo of the project I'm going to be contributing to. Go into the project and press the button "Fork". For those following along at home, go ahead and fork my karlfakegitaccount/learn-git repo. Your screen should look just like mine except the user name at the top is going to be your user name. The one on the left will look exactly the same.
It should now look like this (with the accounts changed to your accounts, of course):
Bear in mind I now have two copies of this repo on GitHub, the master and the origin. They are in different GitHub accounts. I do not have a copy on my local machine yet.
To get a copy on my local machine, see the "HTTPS clone URL" highlighted in yellow in the picture above? Copy that text to the clipboard, go to the command line where you want to "clone" this fork to, and type "git clone URL" where URL is the pasted text. My example:
Now, you can see the file created in the master is populated on my local machine:
Before I start work, I want to make a new branch so I can commit it from that branch. It should make things easier (and when I took the screenshots, I forgot to do this, so when I went to commit, I was still on the master branch... not what I wanted, so I fixed it and didn't update the screenshots... from here on out, where it says "on branch master" read it as "on branch feature_1"). I used the command "git checkout -b feature_1". Feature_1 is the name of the branch that I just made and checked out. So I'm working in this branch now.
Now I am finally set up to begin contributing to this project.
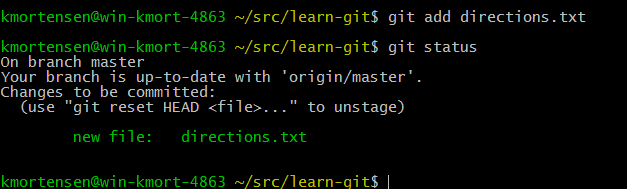
My first task was to implement a file called "directions.txt" explaining how to get to Oz.
Whew. So I put the file in the folder. Typing "git status" shows that there is an "untracked" file in there. I want git to track this file, so I use the command "git add directions.txt"
Now it shows up as tracked.
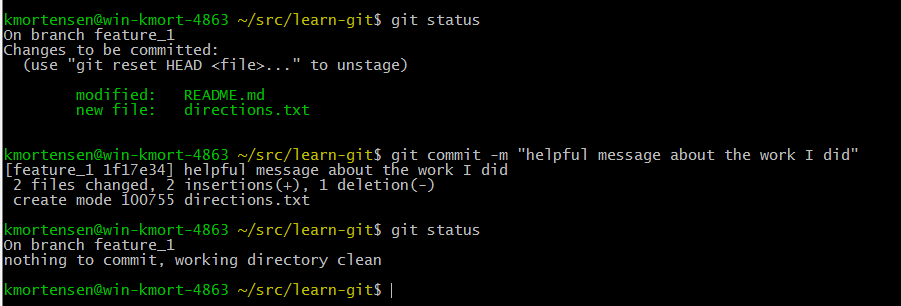
This means that when I commit changes to git, this one will be among them. I also got the task to update the readme file. So I did.
So README.md is modified. Use git add to add it to the list of files staged to be committed.
Now that we have all this work accomplished, let's commit it to git so we don't lose it. Use git commit -m "helpful message about the work I did" with the quotes included this time.
The act of committing saved the changes to git on my local machine, but did not affect GitHub at all.
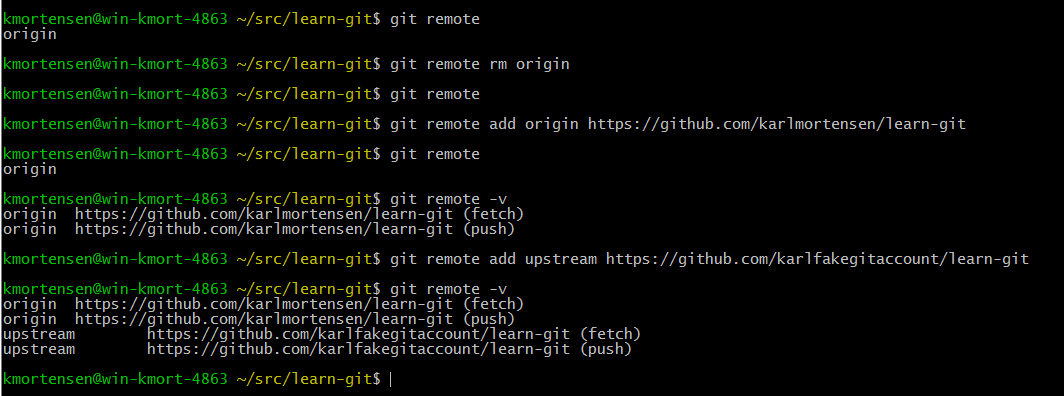
We need to set up one more thing:
Basically, I just taught git what the aliases that I call my different repositories are. The command with the "rm" in it removes the blank origin statement from the list. Then I add in origin and upstream, both pointing at where I want them to be. The command "git remote -v" allows me to see what the alias mapping is currently set to.
If this is your first time committing, you'll get a message asking for your name and email address. Provide it in the format the message shows. This sets up your local machine to talk to GitHub easier.
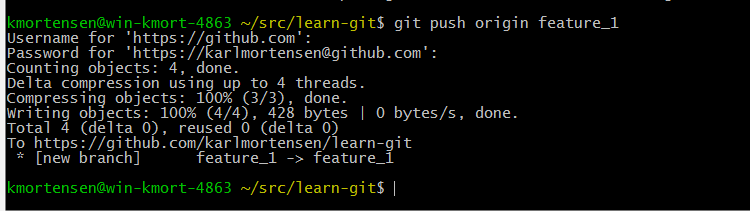
Now, having reviewed all my work and decided it's worthy, I "push" it to my origin with the following command: "
git push origin feature_1"
As you can see on the GitHub website, it recognized that I pushed a change up to GitHub. This went to my "origin" (karlmortensen's fork).
Now, I'm going to do a "pull request" to tell the administrator of the master project that "hey, here's a good change for you to pull into the main repo." Do this with the GitHub website by clicking "Compare and Pull Request", then clicking "Create Pull Request" after it tells you that it's able to merge. The pull request will sit out there until acted upon by the master administrator, who gets an email asking him to merge the pull request into the master repo.
As the administrator, I accepted the pull request and merged the change into the repo. Now, everyone who forks the repo will get these changes as part of their repo. Everyone who updates their fork will get these changes too.
Now, I use the command "git checkout master" to switch back to the master branch, and guess what, my changes aren't there!
Have no fear, this is by design. See, we did the work in the "feature_1" branch, and we just switched over to a branch where this work has not been done. So let's pull these changes from the master so we can be up-to-date with the latest-greatest. We use two commands to do this: "git fetch upstream" and "git merge upstream/master"
The first command pulls the upstream repo down to the local machine, and the second merges in all the changes to the local copy of the upstream in the master branch. As if that's not confusing at all. Whew. The long and short of it is you are now up to date in your "master" branch on your local machine.
That's enough for tonight. Tomorrow we discuss other branches.